Yes, I know- it’s just past Valentine’s Day, and maybe craft blogs are gearing up for spring and Easter. But here I am posting a tree craft that can be used as a Christmas tree ornament. I’ll add those tags to the post so when you’re hunting around for paper crafts in November, you can find it- and hopefully, I’ll remember to add a darker green variant of my printable.
I’ve previously posted 4 activities that can be used to earn the retired Numbers and Shapes Brownie try-it, but since I’m all about options, I’m going to post this project idea as well. It can actually be used for a couple of different try-it/badge requirements. For example, I planned this project for my girls to use for the Stitching It Together try-it. I used it as a substitute for the Button Collage activity. If that wasn’t enough, it’s a fun math activity for students who are learning about 3 dimensional shapes.
Here are the list of supplies I used to make my button tree ornament:
- Square pyramid template or printable
- Buttons- real or paper (this can be a good excuse to explore grandma’s button box, or use those spare buttons that you get with shirts)
- Embroidery floss or thread
- Pom-poms
- Small thread spool- I found packages of these in the wooden shapes section of my local craft store
For the purposes of this tutorial, I’m going to presume that you’ll be grabbing my printable freebie found at the end of this post. It’s given to you as a jpeg file, so all you’ll need to do is open it in your word processing or graphics program, and print it. I’ve included the tree and some paper buttons to add. I have left light fold lines for you to create all of the edges and flaps.
 Square pyramid shapes cut on the Cricut.
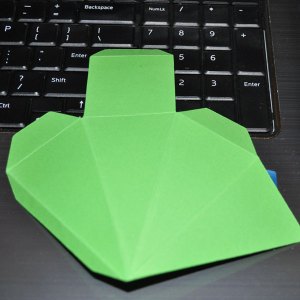
  Scored template ready to fold
Once you have your piece cut out, it will be simplest if you attach the buttons before you assemble the pyramid. For projects like this, I like the effect of the exposed thread tails so I tie them off on the right side of the project and trim.
 Attach buttons using embroidery floss
Once your buttons are attached, you can assemble your pyramid by adhering the side tab. At this point, do not seal the bottom- it will be easier to pull the whole thing together later, attach the pom-pom, and create a secure hanger.
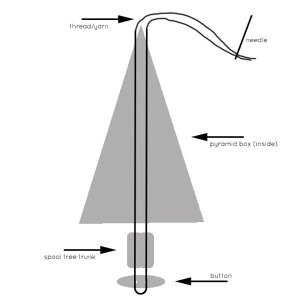
Adding the spool trunk needs the help of a diagram:
You’ll notice in my examples below that I used yarn for this prototype project. Upon reflection, I’m not going to recommend using yarn- go for a lighter weight fiber, such as embroidery floss or pearl cotton. You’ll end up with much less bulk on your needle and will have a much easier time attaching your pom-pom topper. However, the girls will have an easier time tying floss than a much thinner thread- thread is very slippery in small fingers!
I used a fairly long piece of fiber- long enough to run the height of the tree, allow for a decent hanger loop, and to secure the spool with a button. I took my threaded needle and went through the spool, through two button holes, and back through the spool. I stabbed a small hole in the square bottom of the tree structure and fed the needle and thread up through the center of the tree and out of the top.
To attach the pom-pom, I ran the needle right through the center of it- it will hold without the need for glue. Finally, Tie a knot at the end of the thread to make the hanger.
That’s it! For a troop meeting with younger girls, you’ll want extra hands on deck to help with threading needles, but older girls (Juniors and up) should be capable of doing this themselves. I found the sewing exercises have been wonderful with helping the girls become confident with tying knots!
OK, you’ve been waiting all post for it, so here’s my printable freebie for you! Please enjoy!
(Click on preview to download from 4Shared)


